Sewing… does it worry you? Well, fear not crafting warriors, this simple how to can make you the sewing goddess of your own home! From the time that I could sit up on my mother’s lap I have known how to run a sewing machine. That does not mean that I am a terrific seamstress behind the needle. I can sew, but I like to keep it simple… if you know what mean. This nightgown was a delightfully easy procedure that I wanted to share with you. I started with a nightgown that was practically brand new, and designed for an adult. The shoulder clasps were made of plastic and one broke, leaving me with two choices A- throw it away, or B- turn it into a perfectly great piece of clothing for my daughter. (Option B was more my style and I actually debated on a pillow as well.)
You do not need a fancy-shmancy sewing machine to upcycle old clothes; I use a Kenmore that I bought for my mom several years ago when her 30 year old Singer finally met the end. So this is what you will need:
- Simple sewing machine
- Thread (closely matching the garment color)
- A good pair of fabric Scissors
- Thin elastic 1/4th inch would be great!
- One 1-2 inch safety clip
- Pins
- Ribbon (optional)
- Button (optional)
Let’s get sewing! First thing you want to do is cut off what you will not need, and cut straps from the old ones.
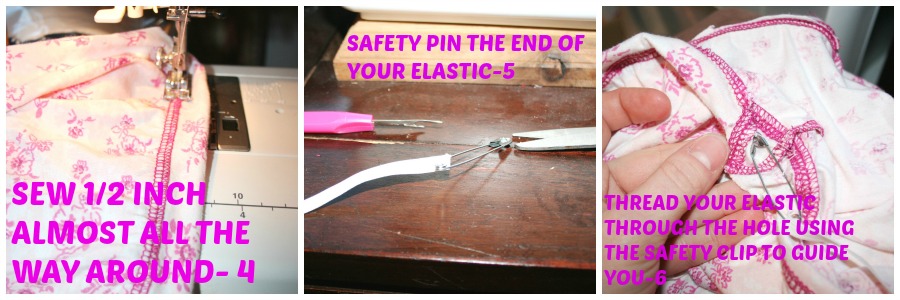
You are ready to hit the sewing machine! Just load your thread and bobbin and get crackin’! Fold the top over approximately 1/2 inch and sew nearly clear around the top leaving about 1 inch to insert the elastic. Think of this like a curtain, were you would need a small space to insert the curtain rod, you do not want to close it up. Trust me, I have done this several times, and I keep a seam ripper handy!
Safety pin the end of the elastic to use as a guide (or like your curtain rod) to thread through your newly sewed space. You will need to measure the amount of elastic to use. Simply wrap the elastic around their chest to a comfortable length with plenty of room to breath. Cut your elastic off about an inch over that mark to give yourself some wiggle room. You may want to safety pin the opposite end of the elastic so you do not lose it in the hole. I hold in my hand, but if it slips out, I lose it and have to start again.
Once you are done threading the elastic. Simply clasp both ends to the safety clip and take quick measure on the person who will wear this to make sure the amount of elastic is sufficient. Then Sew the two ends of the elastic together and proceed to sew up your elastic threading hole to complete your circle completely around the top. It will look like a simple skirt/dress with no straps at this point.
Now you are ready to add the straps. So first you will need to put the garment on your tike and see how long your straps should be; using a pin, you can mark each side, front and back to the perfect length. You can also just measure one side, then measure the length to get the other side and pin. Try to make sure that each side is the same length from the side seam. In other words you want each strap to be the same distance from the shoulder. Then sew the straps in place. You could actually just stop at this point and move on to another project!
To add some simple embellishments, I took matching pink ribbon and made simple bows. I hand sewed them over the front straps to hide the extra threads from sewing on the straps. Then, to hide the thread from adding the bows, I quickly added a couple pink flower buttons. Easy peasy!


All I wanted for Mother’s Day was a sewing machine, and I got one – TWO years ago. It still sits in my closet. I made have to dust it off and give this a try!
LOL – take it out lady and get to sewing :)