**This is a post in Partnership with @driscollsberry**
Making cakes is just FUN! But I have limited skill in it. I can bake a cake. I can decorate on an elementary level, but icing is always my nemesis. Ideas are too! I never know how people get great shapes and fun designs for the cake itself. I guess it is because I did not pay attention in Geometry. But when Driscolls Berries sent me the idea and the instructions for the Berrylicious Bunny Cake, I HAD to see if I could do it! Guess what… I could! It is not exact to theirs… as in, not as perfect. But it is delicious, pretty and a great use of amazing fresh berries in a cake!

- Cake
- 2¾ cups cake flour
- 1 tablespoon baking powder
- ¼ teaspoon salt
- 1½ cup (3 sticks) unsalted butter, at room temperature, cut into pieces
- 1¾ cups granulated sugar
- 1 teaspoon vanilla extract
- 4 large eggs, at room temperature
- 1 cup whole milk, at room temperature
- 1½ cups hulled and chopped Driscoll's Strawberries*
- Frosting
- 1 cup (2 sticks) unsalted butter, at room temperature, cut into small pieces
- 4 cups confectioner's sugar, whisked before measuring (plus extra as needed)
- 2 tablespoons whole milk (plus extra as needed)
- 1 teaspoon vanilla extract
- Decorating Materials
- 1 14 ounce bag of sweetened flaked long-shred coconut
- Purple gel coloring
- 3 packages (6 ounces each) Driscoll's Raspberries
- 1 package (16 ounces) Driscoll's Strawberries
- 1 package (6 ounces or 1⅓ cups) Driscoll's Blackberries
- Cake
- *Use either 1½ cups hulled, chopped strawberries or 1½ cups chopped raspberries for cake batter.
- Preheat oven to 350 degrees F. Thoroughly coat the insides of a Wilton Bunny Pan with nonstick spray and dust lightly with flour.
- Whisk together flour, baking powder and salt in a medium bowl to combine and aerate; set aside.
- In a large bowl with an electric mixer on medium-high speed, beat butter until creamy, about 2 minutes. Add the sugar gradually and beat until very light and fluffy, about 3 minutes, scraping down the bowl once or twice. Beat in vanilla.
- Beat in the eggs one at a time, scraping down after each addition, allowing each egg to be absorbed before continuing. Add the flour mixture in four additions, alternately with the milk. Begin and end with the flour mixture and beat briefly until smooth. Chop enough hulled strawberries (or raspberries) to equal 1½ cups and fold into batter. Pour batter into pan and smooth top with offset spatula.
- Bake for about 40 to 45 minutes or until a toothpick shows a few moist crumbs. The cake will be golden brown on top and around the edges and will have begun to come away from the sides of the pan. Cool pan on racks for 15 minutes. Unmold and place directly on rack to cool completely.
- Frosting
- In a large bowl with an electric mixer on medium-high speed, beat butter until creamy, about 2 minutes. Add 1 cup sugar gradually, beating until light and fluffy, about 3 minutes, scraping down the bowl once or twice. Add remaining sugar, milk and vanilla and beat on high speed until silky smooth; this might take several minutes. Frosting is now ready to use.
- Assembly
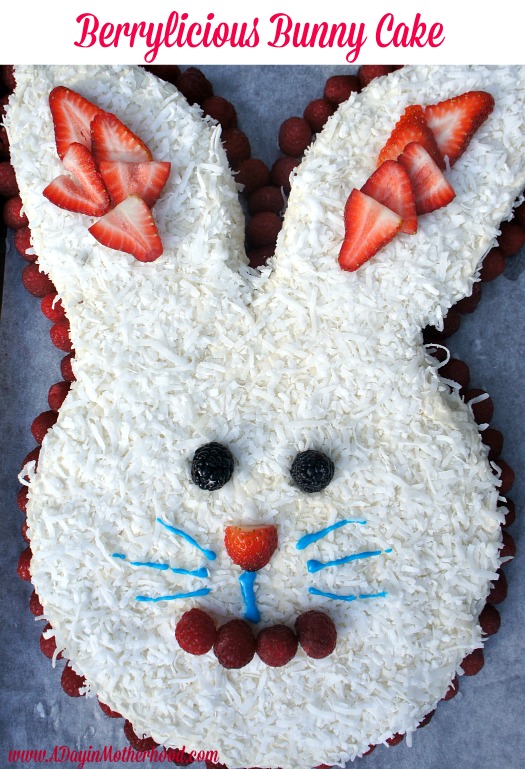
- Place cake on a platter large enough so that it leaves space all the way around the bunny. Frost the cake evenly all over with frosting, reserving ¼-cup of frosting. Press coconut all over cake, tops and sides. Cake may be stored overnight at this point. Bring to room temperature before serving. Use photo as inspiration for decoration.
- Suggestion: Two blackberries for eyes; a vertically sliced strawberry half for a nose, pointing downwards; thin, vertical slices of strawberries to detail the ears; thin, vertical slices of strawberries to create a smile; a small piece of blackberry connecting the nose and mouth; tint remaining frosting a light purple, place in a parchment cone and pipe whiskers; ring the entire bunny with raspberries. Apply fruit decoration right before serving so that they don't stain the coconut.
I do not own a Wilton Step By Step Bunny Pan but I would highly recommend you getting one before you do this cake. My method worked GREAT but I think it is less work and will come out more even looking with the pan.

As far as my method goes, bake 2 8′ or 9′ inch cake pans. Use one pan for the face and then cut the second one into the ears. Just use a serrated knife and make a sort of football shape by carving a curve along the cake. Flip the first side over on top of the other and then use is as a guide to create the second ear. You can use the middle for a bow tie for the bunny if you want. I opted not to, but it would be super cute!
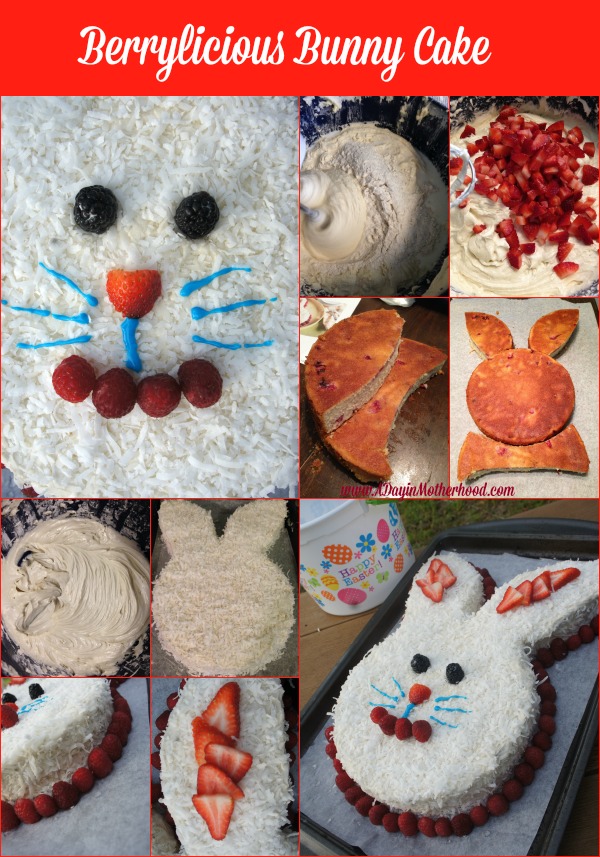
Another tip: Make the cake ahead of time and get it to the stage where the coconut is on. Then let it sit before you add the fruit. Add the fruit right before you serve it so it does not bleed onto the coconut.
This is a dense cake so a little goes a long way. Don’t worry about how think the batter is. It comes out so delicious and rich. Individually, the cake batter and icing taste a little too rich. But when this cake is all together it is pretty, festive and addictingly delicious. Little bursts of fruit jump out and dare you to stop at one bite!
Get more great Cake ideas in the Bake It Like You Mean It: Gorgeous Cakes from Inside Out. And check out my Springtime Layer Cake for a fun and beautiful dessert!


Leave A Comment